Home Page |.Printable Order Form | ArtType Extra | Contact | Order


Gold Letters with Two Color Shade

Creating the Gold fill in Corel is easy, especially if you have worked with fountain fills before.

Start by creating two contours around your lettering. Make the first contour white. Make the second contour slightly larger and color it black Brake apart all contours and select the original letter or object.

Now click on the Fill Tool and select the Fountain Fill Dialog.


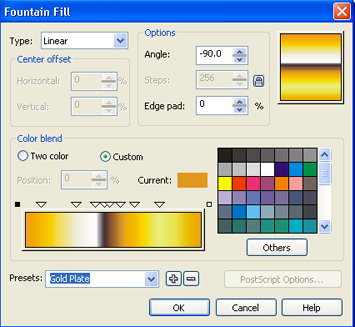
Fountain Fill. In the Fountain Fill Dialog box, check the Custom button under Color blend and arrange the colors as you see below.

Add new colors by double clicking in the area above where you wish to add the color. To remove a color also double click it. Move or blend colors by clicking and dragging the arrows above the colors.

At right, start with Gold, fade to yellow and to white. In the center add a strip of very dark brown. If you don't find it in the color pallet, click Others, and find a suitable color. Don't use black. Blending now to the left, gold, fade to yellow or pale yellow and then back to gold.

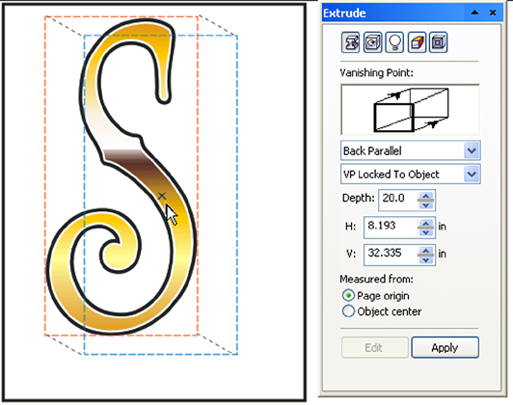
If these color blends don't fall where you want them within your lettering, you may need to do so fine tuning.


Save your Fill by giving it a name in the Presets box and click the + sign.


Extrude. Now that you have the fill color for your lettering, we will use the Interactive Extrude Tool to create a shade. We want to add the extrude shade to the black outer most contour and not to the lettering.

Select the black contour. Click the Effects menu and select Extrude. There are many options for extruding objects and letters, the setting seen below will work for this exercise. Parallel Back and Vanishing Point Locked to Object.

Depth, Horizontal and Vertical settings can be entered in the Extrude window or Click the Edit button and adjust the Depth by clicking and dragging the x in the middle of the blue box.

.

Click Apply and your extruded letter shade will be black. Color and Lighting have already been edited in this illustration.


Color. Now click the Color Button. Three options are available here, Select Shade and choose Red in the From box and Dark Brown in the To box. Or you may want to experiment with your own color choices.

Lighting. In the Lighting window you may have as many as three light sources with control over the intensity and direction of each light. And here experimentation is the best way to learn. Our exercise has only one light source coming from right, center and front. Intensity is set to 59.


Shade Color No.2. Now we have created gold lettering with a single extruded shade. To add the second color on the shade, create a copy of the original. Delete the filled lettering and the white outline, leaving only the black contour and its extruded shade. Adjust the depth and color and move it to the back

You can leave the depth the same as the original, or adjust it to make it shorter by clicking and dragging the x in the blue box. You may also type the depth in the extrude dialog box if you like

I have changed the color shade from medium green to dark green. I also changed the light source and add another to make the No. 2 shade brighter at the bottom. Once they are combined, I feel this helps give the overall object a more defined base.

Move the second shade color behind the original. Leave a slight line of black showing between the two colors. Add a black or dark background and the Two Color extruded shade is finished.

You may like to try this experiment using a small back on the extrude, but when you line up the two colors in the final step, you will need to resize the second color.


Sarsaparilla from Signfonts.com


..


Home Page |.Font Menu | About Us | Contact | Order

(c) 2001 Art&Sign, all rights reserved.